
This is the sourdough process in its essence. To begin, you don’t have to do anything other than these 5 steps.
Are you ready?
You’ve got a strong sourdough starter and you know how to take care of it. Now you’ve fed it and it’s nice and active.
You’re ready!
STEP 1: Mixing
The first step is mixing your ingredients: water, flour, starter and salt. Measure those in weight, following the instructions of the recipe. A simple recipe to start with is our Easiest Loaf Ever.
When you mix your dough, your goal is to end up with a homogeneous dough mass. You don’t want any dry bits of flour. Depending on the recipe, this can take anything from 3 to 10 minutes if you do it by hand.
Mixing your dough thoroughly will start to get you some gluten, which you’ll need for your dough structure.
- Put the water into your mixing bowl. It’s best if the water is at room temperature. If it’s very hot where you are, you might cool the water down a bit by putting it in the fridge for a while.
- Add your active starter and mix it into the water until you have a slurry. If there are still some bits of starter clumping together, don’t worry. You’ll fix that later when you add the flour.
- Add the flour and salt. Some people like to reserve a bit of the water, say 10g or so, to make a salt-water-slurry. It makes mixing in the salt a little easier. I don’t think it makes a big difference. Maybe try both ways and see which one you like better! Mix the dough by hand or with your mixer until you can see no dry bits of flour. The dough should start to become smoother after a couple of minutes.
- Cover your bowl and put it in a warm spot, around 73 to 77F, 23 to 25C. This temperature will be important to how fast your dough ferments. If it’s warmer, your dough ferments much faster, and vice versa.
STEP 2: Bulk fermentation
Bulk fermentation is what you call the first out of two fermentation steps. It starts when you mix your dough and it ends with you shaping it into a loaf.
For most recipes, bulk fermentation takes between 3 and 5 hours. In general, hot temperatures will speed up the process, while cold temperatures will make it longer.
During bulk, your starter will do most of the work for you. The slightly tricky part is to know when your dough is fermented perfectly. If you leave it too long, it will be difficult to shape later. If you leave it too short, your bread might turn out chewy.
Two things happen during bulk: Your dough develops a gluten net and fermentation creates gases that will fill the gluten net and lift it up. Gluten + gases = dough structure.
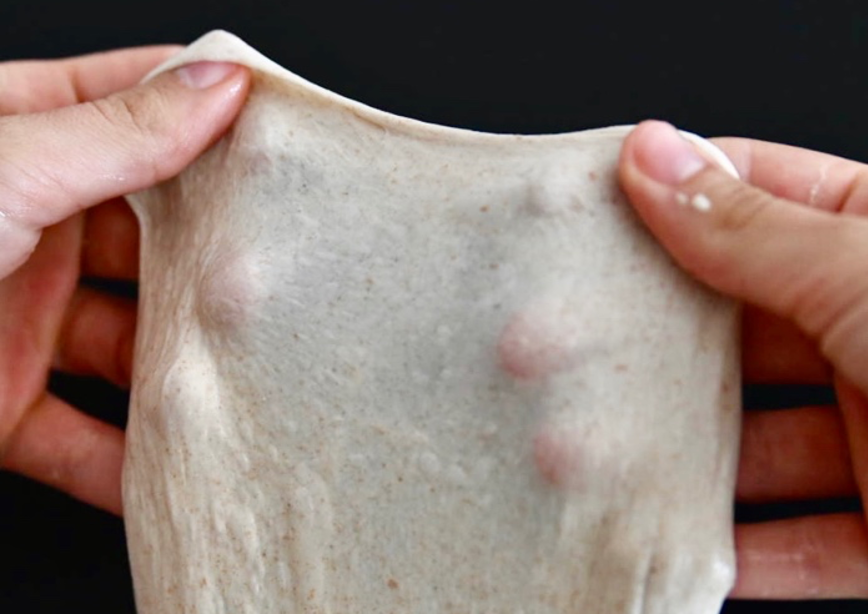
To judge if your dough has developed enough gluten, you can take a bit of dough into your hands and gently stretch it between your fingers. Pay attention to how much you can stretch it before it tears (which it will, eventually). Can you pull it so that it’s almost translucent, so you can see your fingers through the dough? Then your dough has formed enough gluten. Does it tear before it forms a windowpane? Then it needs more gluten.
Gluten forms through time and through stretch-and-folds. This is a technique that ou can use to give a weaker dough some strength. Most recipes tell you to do 4 sets of stretch-and-folds or so, 30 minutes apart. It takes about a minute to do and goes like this: You take one side of your dough with your wet dough, stretch it upwards and fold it onto itself. Then you turn your bowl 90 degrees and repeat with the next side of the dough, until you’ve done all 4 sides.
Fermentation is a little bit trickier to judge. Your dough is ready if it becomes jiggly, soft, smooth and stretchy and has increased considerably in volume. Don’t worry, after a couple of bakes, you’ll know that your dough is ready at one glance.
STEP 3: Shaping
After bulk fermentation, the next step is to shape your dough into a loaf. That’s the last thing you need to do before the final proofing step.
Most of the time, you see people use a two-step shaping process. They preshape their dough and shape it a second time after a short bench rest. If you’re just starting out, feel free to skip the preshaping step.
Your goal is to create a nice, taut ball that has some tension and will hold its shape.
There are many different shaping methods, each suited for a different kind of dough. For a stiff, beginner-friendly dough, you can use the following method for both preshaping and shaping:
Turn your dough onto your lightly floured work surface. With one hand, you round the dough. With your bench knife, or with the other hand, you create tension by pressing one side of the loaf towards the other side. Then you turn the loaf a bit and repeat. I’ve included a video of the great Trevor Jay Wilson doing that.
After you’ve shaped a ball, you can flour the surface lightly and put it top down into a floured proofing basket or “banneton”. You can buy one of those at the online marketplace of your choice, or you can use an unstructured tea towel, flour it generously, and place it into a bowl.
Cover your proofing basket, making sure that the cover doesn’t touch the loaf. You can flour the surface of the loaf – the bottom – just in case. I use really huge reusable plastic bags. I just slide the entire banneton in and close the bag.
STEP 4: Final proofing
Your dough is now a loaf and is going through its second and final fermentation step. Your only job is to know when it’s done proofing and ready for the oven.
A good indicator is the finger-poke-test: Use a wet finger to gently poke into you loaf. Pay attention to how fast the dough springs back to fill in the indentation from your finger:
- The dough springs back fast and completely? It’s likely underproofed.
- The dough doesn’t spring back at all or only barely? It’s likely overproofed.
- The dough slowly springs back (almost) completely? It’s likely perfect.
There are other signs, too:
Your dough should have risen noticeably. If you use a banneton with coils, you can count the coils you see when putting the dough in and compare that to the number of coils at the end of proofing. If it’s proofing in a tin, note how high the dough domes over the top.
Just how much rise you should be going for depends on how much your dough has been allowed to rise during bulk fermentation. A dough with a short bulk can be left to rise more than a dough with a longer bulk.
Also, the loaf’s surface should be smooth and evenly stretched. It shouldn’t be torn or overly dimply. The loaf should look round and full, not flat or deflated.
Press on your dough lightly. If it feels smooth, good! If there’s lots and lots of tension, your dough is probably still underproofed. If there’s not much tension left, it might be overproofed. If your touch makes bubbles appear, it’s definitely overproofed.
STEP 5: Baking
The last step before you can eat the delicious result of your efforts: baking!
Turn your banneton around and let your dough gently slide down onto some parchment paper. You can now score it, which means use a sharp blade to make a cut into its surface. Or you can skip this step, which will result in a rougher-looking but equally delicious loaf.
Your dough will need some steam to bake perfectly. You can either put the loaf into a Dutch Oven and keep the lid on for the first 15 minutes, or you can create some steam some other way. For example, you can pour some boiling water into a pan that you place at the bottom of the oven.
Your oven should be preheated to around 500F/260C. Then put the loaf in and reduce the temperature to 450F/232C.
Bake your loaf for anything between 30 and 50 minutes, depending on the recipe and your liking.
That’s it! Not too complicated 🙂
Now you’re ready to bake your first loaf of sourdough! Head on over to our Least Complicated Sourdough Loaf Ever.
